Tuesday, October 30, 2012

berry smoothie.

With summer now with us, the warmer weather is begging for cool drinks. The other day, while the heat was near unbearable and I was basking in the coolness of my house (which is like a fridge, no joke) I decided to make a smoothie out of the fresh berries in my fridge instead of eating them (oh, what a conventional way of consuming them :P)

Berries, of all kinds, are my favourite fruits. The fact I don't consume nearly enough dairy products means this is the best way to meet my nutritional needs while keeping my taste buds happy! Not to mention this is super easy to make :)

This recipe makes approximately one 350ml glass.

INGREDIENTS:
  • 2 cups of mixed berries - this is an approximate
  • One 175g tub of yogurt - I used Yoplait's raspberry
  • 150ml of milk - I used skim

METHOD:
  1. Put all ingredients in a blender or beaker (if you have stick blender, like me) - and blend
  2. VOILA! How easy was that! Now sit back, relax and enjoy your berry smoothie and the warm weather :)
Photobucket
facebook | twitter | instagram | bloglovin'

Friday, October 26, 2012

c coconut water.

When I first heard about C Coconut Water I didn't know what was so special about it. After having seen countless number of Instagram images from other bloggers, I figured it had to be something worth looking into - and I was right.

C Coconut Water is pure organic coconut water with no added preservatives, colouring, or additives. It also has numerous amount of benefits such as:
  • Boosts immune system naturally
  • Contains chemicals to counter fatigue
  • Increases metabolism and weight loss
  • Aids in circulation
  • Detoxifies and fights viruses
  • Fights against stress
  • Balances body pH
  • Naturally hydrates
  • Clears complexion
  • Hangover cure
The main benefits that caught my attention was the fight against stress, clearing of complexion, boost in immune system and increase in metabolism. With the last leg of my university semester I have been under considerable amounts of stress which causes bad complexion and a lowered immune system which is all balanced out by C Coconut Water.

I love drinking it after exercising because of its hydrating qualities as well. C Coconut Water is sold by cartons of 12, at $35.90 a carton. So be sure to enter carton numbers when  you buy it online, I was a little confused when I first went to buy it.

I'm loving it so much, I bought another carton just yesterday!

Photobucket
facebook | twitter | instagram | bloglovin'

Tuesday, October 23, 2012

buttermilk pancakes with caramelised bananas.

I have this little HUGE soft spot for pancakes. It's the one thing that I love ordering while I'm abroad that makes me feel as if I'm home again, which is odd considering they originated in Greece (yes, I Wikipedia that..) But it also links me back to memories of being abroad like when I had an EPIC sized pancake in America, and by EPIC I mean the length of a mini platter (approx. 30cm wide), or when I ordered pancakes, also in America, and they gave me waffles...

Anyway, I've always made pancakes out of the shake 'n mix because I never really looked or bothered with making ones from scratch, and I was called out on this by my best friend when I was searching for pancake mix: "don't you always make things from scratch??", and my response: "not pancakes, they're special" - but this moment had always stuck in my mind, so with some left over buttermilk from the jam donut recipe I decided to make some buttermilk pancakes...from scratch.

This recipe makes 4x 20cm pancakes...I poured out too much in the first one, so the size had to be consistant...

INGREDIENTS:
  • 1½ cups self-raising flour - once again, I had no self-raising so I substituted it with plain flour + baking soda...I really need to restock on self-raising...
  • 2 tablespoon caster sugar + a bit more for the caramelised bananas, I don't know exactly how much I used...
  • 375ml buttermilk
  • 1 egg
  • 1 tablespoon melted margarine
  • 2 ripened bananas
  • A bit of water....

METHOD:
  1. Sift flour into a bowl
  2. Create a well and mix in egg, margarine and buttermilk one-by-one until the batter is smooth
  3. Pre-heat a non-stick pan over medium heat
  4. Cook pancakes one at a time - as this batter isn't silky smooth like pancake mix, you will have to spread out the mixture until it's about ½cm thick
  5. Flip pancake when you can see at least 50% of cooked pancake showing through the batter - given you didn't make it too thick... usually pancakes bubble to indicate it's breathing, but I think because I used plain flour it didn't do that properly...
  6. Once the other side is cooked, pop onto plate
  7. Repeat until the mixture is used up
Caramelised Banana Method:
  1. Keep the pan you were using for the pancakes on
  2. Cut bananas in half both length ways, and split
  3. Put bananas inside-side down onto pan
  4. Pour caster sugar to coat the bananas, and a little on the pan - splash some water until the sugar starts to bubble like caramel - sorry I don't have exact measurements...
  5. Once caramel begins to brown (which is fairly quickly), flip bananas over to coat in the caramel
  6. Fish the bananas out - be careful you don't burnt the caramel, burnt caramel tastes VERY bitter
  7. VOILA! Put your bananas on top of your pancakes, and you're good to go!

Photobucket
facebook | twitter | instagram | bloglovin'

Sunday, October 21, 2012

it's a 21st party.

A few weekends ago was my joint 21st party with my best friend/boyfriend and because I love baking so much I decided to bake a few treats for the guests. I baked jam donut cupcakes, red velvet cupcakes and a chocolate coffee layered cake (as per request by the birthday boy), but with a special twist (also requested by the birthday boy).

I was so proud of myself when I completed the cake as I only had one chance to get it right on the day (although I did practice the icing the week before, JUST IN CASE). It was so pretty that nobody cut it on the night, which was a good thing for us as we inhaled this monster the next morning ;)

The blue icing is just vanilla icing with one teaspoon of blue colouring. The same vanilla icing from my red velvet recipe ;)

I also learnt a very important as I made these cakes for the party - the correct ingredients + the correct amount of ingredients + a good oven makes a world of difference!


Photobucket
facebook | twitter | instagram | bloglovin'

Friday, October 19, 2012

n2 extreme gelato, sydney.

When I first found about N2 Extreme Gelato I was completely over the moon. I love trying quirky flavours and the best thing with the heating up Sydney is I can try the continually changing menu at N2. When I went, during Chinese Moon Festival, there were flavours such as PB&J (what I got) and Earl Grey Caramel (what my friend got). Not only do N2 do quirky, original gelato flavours, like Buttered Popcorn, the ice-cream is made to order with liquid nitrogen!

The liquid nitrogen flash freezes the flavoured mixture in the Kitchenaid before you eyes. You watch as liquid nitrogen gas, that thoroughly entertained me as a kid, flood through the cute gelato house. Words can't describe the excitement and novelty of watching this process!

The only problem with the flash-freeze method is, I noticed, the gelato melts a LOT faster, but that's ok, the brilliant flavours and entertainment value makes up for it.

You can submit a flavour, or browse their past flavours through their website.

A single scoop, like what I had, is $6 each.

Find them:
Lot 43, 1 Dixon St, Sydney
1pm-11pm

P.S: Another problem with N2, their opening hours aren't early enough *sigh*

N2 Extreme Gelato on Urbanspoon
Photobucket
facebook | twitter | instagram | bloglovin'

Tuesday, October 16, 2012

red velvet cupcakes.

Who doesn't like red velvet cupcakes? They're chocolate cupcakes that are red and super pretty! Ok that sounds really stupid, but seriously they are the prettiest cupcakes and a classic! I was so ecstatic when my boyfriend bought me one a few months back, and they're just a blogger Instagram staple. Hmm this blog post is starting to sound very pretentious, but seriously I love them because they are super cute and to have some laid out at any party is bound to get some attention, people beeline for red velvet!

Anyway, I have always loved eating red velvet but hated making them because the cream cheese icing always failed dismally so finally I decided to scrap the typical cream cheese icing and stick with what I know, vanilla icing.

This recipe makes 24 cupcakes

INGREDIENTS:
  • 2½ cups self-raising flour
  • 1 tablespoon salt
  • 2 tablespoon cocoa powder
  • 2 eggs
  • 1½ cups caster sugar
  • 1½ cups vegetable oil
  • 1 tablespoon vanilla essence + 1 tablespoon for icing
  • 2 tablespoon red food colouring
  • 2 tablespoon apple cider vinegar
  • 1½ tablespoon baking soda
  • 1 cup buttermilk
  • 100g softened unsalted butter
  • 250g icing sugar

METHOD:
  1. Preheat oven to 180˚C
  2. In a large bowl mix sifted flour, cocoa and salt together
  3. In a separate bowl, using a mixer, beat in sugar and oil until well combined
  4. Add eggs one at a time, until combined
  5. Add vanilla and food colouring
  6. Alternate adding flour mixture and buttermilk
  7. Stir in vinegar and baking soda
  8. Spoon in mixture into cupcake paddies in tray, approximately one tablespoon for each
  9. Put into oven and take out when skewer comes out clean, put aside to cool before putting icing on
Vanilla Icing Method:
  1. Beat together unsalted butter, sifted icing sugar and vanilla essence until smooth
  2. Pipe icing onto cool cupcakes
  3. VOILA! Red velvet cupcakes are ready to be snapped up! I decorated mine with a chocolate heart on top just for the added cuteness :)
Photobucket
facebook | twitter | instagram | bloglovin'

Friday, October 12, 2012

pancakes on the rocks, darling harbour.

When I first found out my boyfriend had never been to Pancakes On The Rocks I was shocked and appalled. So for his birthday I knew I just had to take him there to show him what he'd been missing.

I ordered the devil's delight $13.95, and my boyfriend ordered the bananarama $10.95 with a caramel milkshake $3.95.

As I had remembered, the meals were so big we were both so full we had a food coma and had to be rolled out of the diner! Ok, slight exaggeration, but we were both so full we were tempted to catch one of those Darling Harbour trams back up to the city.

Pancakes On The Rocks, as the name indicates, was initially opened on The Rocks but have since franchised out to several locations including the one I went to in Darling Harbour.

Find them:

NSW
Darling Harbour - 227 & 229-230 Harbourside Shopping Centre, Darling Harbour
The Rocks - 4 Hickson Rd, The Rocks
North Strathfield - 3 George St, North Strathfield
Northmead - 100 Briens Rd (Cnr Redbank Rd), Northmead
Campbelltown - Centric Park, 4 Hyde Parade, Campbelltown

QLD
Mermaid Beach - 2488 Gold Coast Hwy, Mermaid Beach


Pancakes on the Rocks on Urbanspoon
 Photobucket
facebook | twitter | instagram | bloglovin'

Monday, October 8, 2012

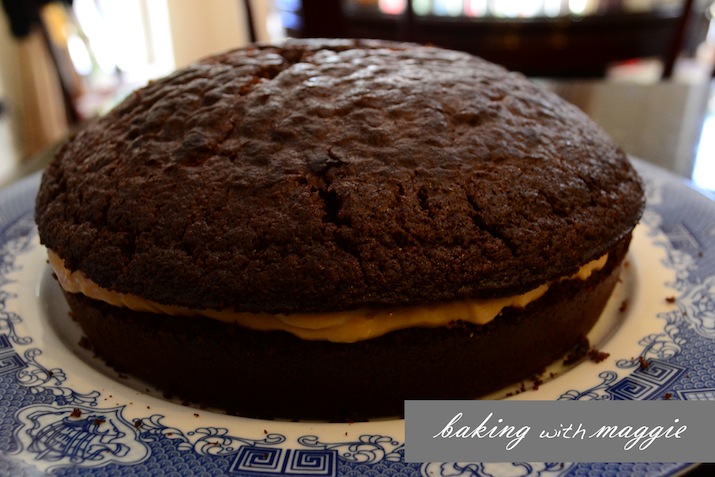
chocolate & coffee layer cake.

I have a weird confession, I don't like making layered cakes because I have no patience for it. I hate having to cut open the cake and wait for it to cool before putting the filling in (same with icing, which explains why sometimes it looks more like a pool of icing than proper icing...) but because my boyfriend was adamant about having a layered cake for our birthday party I decided I would wait it out and make him what he wanted.

I decided to make a classic chocolate cake with coffee filling, my two favourite things (I have a lot of favourite things..) - so here is my chocolate and coffee layered cake.

This recipe makes 8-10 pieces.

INGREDIENTS:
  • ¼ cup cocoa powder
  • 125ml boiling water
  • 125g unsalted butter, at room temperature
  • 200g caster sugar
  • 3 eggs
  • 1 teaspoon vanilla essence
  • 1½ cup self-raising flour
  • ½ teaspoon baking powder
  • ¼ teaspoon salt
  • 100ml milk
  • 250g mascarpone cheese
  • 85g icing sugar
  • 1 teaspoon instant coffee dissolved in 2 teaspoons hot water

METHOD:
  1. Preheat oven to 190˚C
  2. Sift cocoa powder into bowl and stir in boiling water to make a paste - set bowl aside to cool
  3. In a separate, large mixing bowl, beat butter until creamy
  4. Slowly add in sugar to butter mix until light and fluffy
  5. Gradually beat in eggs and vanilla essence
  6. Fold in sifted flour, baking soda and salt into butter mixture
  7. Mix in milk
  8. When thoroughly mixed, pour mixture into greased round cake tin (approx. 20cm diameter)
  9. Bake until skewer comes out clean
  10. Once cooked, tip cake out onto cooling rack and cut in half to cool
Coffee Filling Method:
  1. Beat the mascarpone with sifted icing sugar and coffee together until smooth and creamy
  2. Once cake has been cooled, evenly spread filling on base and pop the top of the cake back on top
  3. Voila! The cake is complete! Enjoy with a hot cup of coffee or tea for the perfect afternoon treat :)
Photobucket
facebook | twitter | instagram | bloglovin'

Friday, October 5, 2012

lindt cafe, martin place.

Last weekend my best friend and I headed out to Martin Place to enjoy a nice big morning dose of chocolate at the Lindt Cafe. Having not craved or treated myself to chocolate for almost a month the thought of eating and drinking as much chocolate as my body would let me made my heart flutter.

I've always loved Lindt chocolate. The first time I had a piece I couldn't bare to eat any other chocolate because no other chocolate was quite as smooth and delicious. So the first time I went to a Lindt cafe, several years ago, I felt like I had died and gone to heaven.

So what delicious chocolate treats did I inhale? (Yes, inhale. My friend was just digging into hers when I had polished off my waffles and hot chocolate...)
We both had - waffle with vanilla ice-cream and chocolate sauce $16
To drink, I had -  hot chocolate $7

I was a little disappointed by their vanilla ice-cream. You could tell it was 'homemade' because you could see the vanilla specks in the ice-cream, sadly the ice-cream tasted funny and bland, not vanilla-y at all. However, I have had the same ice-cream at the Cockle Bay store and that was spectacular!
Thought I'd throw in a gif of how I managed to ruin my waffles when I got over-excited with the chocolate sauce and just kept pouring...

Find them:
I went to the Lindt Cafe at Martin Place, but they have many stores tucked away around Sydney & Melbourne!

Sydney
Martin Place - 53 Martin Place (Cnr Phillip St), Sydney
Cockle Bay - 104-105 Cockle Bay Wharf, Darling Harbour
George St - Suncorp Building, 259 George St (Cnr Jamison St), Sydney
Miranda Westfield - Kiosk 11, Level 2, Miranda Westfield

Melbourne
Collin St - 271 Collins St, Melbourne
Chadstone - Shop B193, Lower Ground Level, Chadstone Shopping Centre
Chapel St - Shop T7, 500 Chapel St, South Yarra
Southgate - Shop G09, 3 Southgate Ave, Southgate Retail Precinct, Southbank

 Giant Lindt chocolate ball decoration..
Lindt Chocolat Café on Urbanspoon
Photobucket
facebook | twitter | instagram | bloglovin'

Tuesday, October 2, 2012

jam donut cupcakes.

I did not try my first jam donut until I was 20, and the first bite was absolutely heavenly. My only qualm with donuts are the fact they're deep fried, so I thought it'd try to bake my favourite naughty treat and voila, this is my jam donut cupcake!

This recipe makes 18 cupcakes.

INGREDIENTS:
  • 4 cups self-raising flour - I only had 2 cups of self-raising (because I ran out...) so I substituted the remaining 2 cups with plain flour and 1½ tablespoon of baking soda
  • 1¼ caster sugar + 6 tablespoons to coat
  • ½ cup canola oil
  • 2 eggs
  • 350ml buttermilk
  • 2 tablespoon vanilla essence
  • jam - I used blackberry jam
  • 50g unsalted butter
  • 2 tablespoons ground cinnamon

METHOD:
  1. Preheat oven to 180˚C
  2. Sift flour in bowl, add a pinch of salt (I did 5 twists of ground salt) and the caster sugar
  3. In a jug, combine canola oil, eggs, buttermilk and vanilla
  4. Add slowly to dry mixture until combined well
  5. Place enough mixture just to cover the base of muffin hole
  6. Place two to three teaspoon of jam - I only used one for this round and there was NOT enough jam
  7. Cover the jam with a tablespoon of mixture
  8. Bake for about 15mins - check that the mixture is cooked through
  9. Melt the butter in a bowl
  10. In a separate bowl, mix the additional caster sugar and ground cinnamon
  11. Once cupcakes a cool to handle, brush the cupcake with melted butter then roll into the cinnamon sugar mixture
  12. Voila! Now they're ready to be nom-ed! I had some thickened cream sitting in the fridge so I whipped it up and turned it into whipped cream to serve with it.
Whipped Cream Method:
This bit is super easy:
  1. Pour cream into bowl
  2. Whip until thick, whipped cream texture - this could take a while if you're hand-whipping, so don't fret it nothing seems to happen for at least 5 minutes. If you're using an electric whisk, be very careful not to over-whip!
Photobucket
facebook | twitter | instagram | bloglovin'
Related Posts Plugin for WordPress, Blogger...